AZ_kayaker Posted June 30, 2023 Report Share Posted June 30, 2023 I wanted to make another glide bait, something that has more of a glide action rather than a chop or burn like my previous. This, being only my second bait made, is going to be a master so I can mold and cast in resin. Pouring resin is easier than re-carving if I mess up or I want to change the joint angle or location of hardware. I do not draw but this is the shape that I came up with after way too much time sitting there deciding on lines. Now that it’s made, I kind of wish I wouldn’t have made it so tall but as with anything, we are our own worst critic. When I made my last lure, I didn’t have any power tools. This time I picked up a scroll saw and bench sander to make quick work of this. Decided to take a break from sanding and go fishing, turns out someone thought it was a parking lot. Not sure what happened but when the sheriff arrived nobody was in the car. Still tired of sanding I got to painting one of my other glides for a buddy of mine in the color way he requested. It turn out good but I’m not sure I like the design. I decided to get back at the lure after wrapping up painting and this is the progress I made until I was unsure of the direction I wanted to go. A part of me wanted to do scales, then I thought maybe just the fin and call it good. I can always paint scales if I wanted them. Here she is, ready to make a mold next next week and get to testing. I’m pretty stoked how it turned out, simple and clean. I put it next to my K9 for size reference. GreenPig, Bass478, BrierBob and 5 others 8 Quote Link to comment Share on other sites More sharing options...
Hoosier_Hawgz Posted June 30, 2023 Report Share Posted June 30, 2023 9 hours ago, AZ_kayaker said: Not sure what happened but when the sheriff arrived nobody was in the car. That is nuts, sucks about the car being trashed but hopefully nobody got hurt in the process. 9 hours ago, AZ_kayaker said: Here she is, ready to make a mold next next week and get to testing. I’m pretty stoked how it turned out, simple and clean. I put it next to my K9 for size reference. You’ve got really clean lines going on there, that’s some work to be proud of. For only your second one ever you’re off to a great start. Keep ‘em coming! Big Epp 1 Quote Link to comment Share on other sites More sharing options...
AZ_kayaker Posted June 30, 2023 Author Report Share Posted June 30, 2023 1 hour ago, Hoosier_Hawgz said: That is nuts, sucks about the car being trashed but hopefully nobody got hurt in the process. You’ve got really clean lines going on there, that’s some work to be proud of. For only your second one ever you’re off to a great start. Keep ‘em coming! Thanks for the positivity! I will post more as I finish it up, including videos. Quote Link to comment Share on other sites More sharing options...
porkmeatballs Posted June 30, 2023 Report Share Posted June 30, 2023 Looks like a great start! I personally love keeping my baits smooth because it gives them a cleaner look and allows for more painting options. Can't wait to see what you come up with! AZ_kayaker 1 Quote Link to comment Share on other sites More sharing options...
danthefisherman Posted June 30, 2023 Report Share Posted June 30, 2023 A great start and good profile! AZ_kayaker 1 Quote Link to comment Share on other sites More sharing options...
AZ_kayaker Posted July 4, 2023 Author Report Share Posted July 4, 2023 Got back at it today. My mold is done and I casted my first resin casting to set up. I even got the math right for no wasted resin. By knowing the volume of my master, and the density of my resin/microsphere mixture, I can poor the exact amount to fill the mold up. I decided with this glide I wanted to add magnets for the hooks. When I was fishing my K9 the other day, I kept getting the line around the stock front hook and it drove me nuts. Turned out pretty good. Just sprayed some primer on it to fill some of the sanding spots after cutting the vent flashing off. Here she is! Balanced each half, both sink at the same rate and stay level. Came out to 10 inches and 6.6 oz. Sinks a foot in about 1.2-1.5 seconds. JustBassinAround916, SoCalBassBum, Bs94 and 3 others 6 Quote Link to comment Share on other sites More sharing options...
SoCalBassBum Posted July 5, 2023 Report Share Posted July 5, 2023 Great looking bait, wish I had the patience to even attempt a bait. Love the magnet idea, I have done this on a few baits with tiny rare earth magnets. Keeps the hookrash down and keeps the line from fouling. AZ_kayaker and Big Epp 2 Quote Link to comment Share on other sites More sharing options...
AZ_kayaker Posted July 5, 2023 Author Report Share Posted July 5, 2023 Not the best video as I don’t have a tripod and the reflection of the water is bad. I didn’t have much time to play with better angles. Action is decent, sinks a bit faster than I wanted but water temp is pretty high since ambient temps this week have been 112 for the highs. I think I will take a bit of weight out, and try to narrow the joint space to see if I can get a wider glide. I can burn or chop this thing pretty well with it remaining really level. It’s hard to see but when I paused it, it flutters when it sinks. All in all I’m really happy where it’s at first go around. GreenPig 1 Quote Link to comment Share on other sites More sharing options...
Hoosier_Hawgz Posted July 5, 2023 Report Share Posted July 5, 2023 Man that is a sweet bait! What color schemes are you thinking of painting them? Quote Link to comment Share on other sites More sharing options...
xgash Posted July 6, 2023 Report Share Posted July 6, 2023 That looks sick man love the profile and how clean it looks. Keep us updated on what else you do to it. AZ_kayaker 1 Quote Link to comment Share on other sites More sharing options...
GreenPig Posted July 6, 2023 Report Share Posted July 6, 2023 Very Nice AZ_kayaker 1 Quote Link to comment Share on other sites More sharing options...
AZ_kayaker Posted July 6, 2023 Author Report Share Posted July 6, 2023 9 hours ago, Hoosier_Hawgz said: Man that is a sweet bait! What color schemes are you thinking of painting them? I just painted these up today and I was thinking something similar, a simple shad color pickle, Dink whisperer, GrizzleyShad and 2 others 5 Quote Link to comment Share on other sites More sharing options...
AZ_kayaker Posted July 7, 2023 Author Report Share Posted July 7, 2023 Final weight after some adjustments for a slower sink is 6.43oz or 182.4g. I had to spray paint this one white(super cheap paint since it’s coming off) to better see it in the lake so it has a decent layer of primer and spray paint, hopefully a similar weight to airbrush and clear coat on the next casting. I’m pretty happy with the results and sink rate. VolunteerSwimbaits and GreenPig 2 Quote Link to comment Share on other sites More sharing options...
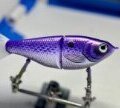
AZ_kayaker Posted July 11, 2023 Author Report Share Posted July 11, 2023 Got her painted up GreenPig, JustBassinAround916, BigBaitThirty and 3 others 6 Quote Link to comment Share on other sites More sharing options...
SacPig916 Posted July 11, 2023 Report Share Posted July 11, 2023 They look great man, nice job with both of them AZ_kayaker 1 Quote Link to comment Share on other sites More sharing options...

Recommended Posts
Join the conversation
You can post now and register later. If you have an account, sign in now to post with your account.
Note: Your post will require moderator approval before it will be visible.