Secondshiftlures
-
Posts
36 -
Joined
-
Last visited
-
Feedback
0%
Recent Profile Visitors
387 profile views


-
 Secondshiftlures reacted to a post in a topic:
Shad baits!
Secondshiftlures reacted to a post in a topic:
Shad baits!
-
Secondshiftlures reacted to a post in a topic:
Shad wakebait attempts
-
flaswimbaiter reacted to a post in a topic:
Shad wakebait attempts
-
Big Epp reacted to a post in a topic:
Shad wakebait attempts
-
Big Epp reacted to a post in a topic:
Shad wakebait attempts
-
azsouth reacted to a post in a topic:
Shad wakebait attempts
-
Secondshiftlures reacted to a post in a topic:
What do you prefer to make your master out of?
-
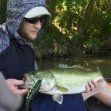
I finally got around to painting a couple of these lures. First fish I hooked up with after getting one finished is my new PB at 6.8lbs. I was sure I would get a big fish on it eventually but didn't expect it to happen so soon. Talk about a confidence boost!
-
Mikeward reacted to a post in a topic:
Rat revisited
-
Secondshiftlures reacted to a post in a topic:
9.5” trout glide
-
I have made about a dozen variations since my last update and finally got around to bustin the airbrush out. Pretty pleased with how this one turned out. I promised a coworker a lure over a year ago now so it is getting traded for $20 and a gallon of 2 stroke oil.
-
 Brendan2468 reacted to a post in a topic:
Pin material
Brendan2468 reacted to a post in a topic:
Pin material
-
Secondshiftlures reacted to a post in a topic:
Time for a topwater!
-
There are probably cheaper options out there McMaster.com 2153T11
- 1 reply
-
- 1
-
-
Secondshiftlures reacted to a post in a topic:
Shad wakebait attempts
-
Inkedup fishing reacted to a post in a topic:
Shad wakebait attempts
-
Progress has been slow the last month or so. I made 4 more of these shad wakes. 2 with no tail very similar to one of the first iterations. I tried some EPDM sheet for tails I snagged out of the trash from work for the other 2. It works great as long as you are careful not to pull it through a tree branch, bounce it off a dock, or catch a fish... I am really needing to get the air brush out to start working through the backlog I have built up. At this point I have more lures needing paint than I have ever finished. I hope some of you can relate.
-
HandCraftedLureCo reacted to a post in a topic:
Hook Hangar, Lip, Joint Questions
-
Secondshiftlures reacted to a post in a topic:
Project war pig
-
Secondshiftlures reacted to a post in a topic:
Redesign?
-
JustBassinAround916 reacted to a post in a topic:
Shad wakebait attempts
-
Secondshiftlures reacted to a post in a topic:
River fishing for GTs in Okinawa with swimbaits
-
Secondshiftlures reacted to a post in a topic:
Swivel hook hangers
-
Jinxd12 reacted to a post in a topic:
Shad wakebait attempts
-
Moving the weight around helped but I still think I need to tighten up the joint. I did catch a fish while testing on my lunch break. Not much by SU standards but a confidence booster none the less. Here is a swim vid showing the action after weight adjustment. PXL_20220601_175211438~2.mp4
-
I tested the next iteration today. I moved the bib forward and changed the angle/shape/size some. Also the tail is now jointed as a few of you suggested. Right now it doesn't swim as good as I think it could but definitely is fish worthy. It seems like it is fighting itself and could be more fluid. I am going to tighten up the main joint and move some weight around. PXL_20220531_173236585~2.mp4
-
I stayed busy this weekend in the garage and made good progress on my wake projects. I got a rat ready for testing, cut the single piece in half and got 4 more ready to carve. The creek near my work where I have been testing these is full of rio grande cichlids so I am going to give that shape a go. I tested the shad I cut in half and it swims great. I am going to put a dress a treble hook on it for a tail. For the shads I am taking y'all's advice by moving the bib forward and making the tail jointed.
-
I like to use eye screws. I drill a hole that is about .03 smaller than the major diameter of the threads. Soak the wood in wood hardener. When I screw them in I fill the hole and cover the screw with super glue. You got it on the lip. I like to cut the slot before starting to shape the bait. I am curious to know what everyone else is doing for hardware.
-
I went for a swim after work on Friday to try and get my original bib back but wasn't able to find it in the muck even knowing right where it is. I was able to get another bib made Saturday morning. I think the issue with the first one was I simply didn't put very much CA glue. When I put these in I start out with a very small amount so that I can look it over closely and make sure I like the alignment. I don't think that I went back and filled it in the rest of the way. I do scuff the surface up before gluing them. I actually milled the thickness on these because the PC my work donated is larger than my table saw kerf. So there should have been plenty of purchase. I tested out my new bib today and got more positive feedback. I have never caught much at this creek where I am testing. It's pretty small waters and heavily pressured. I never have much luck especially on bigger stuff. This fish beats my biggest in this area by at least a pound. I am going to call this lure done for now. I'll get the airbrush out here before too long. I have a bunch of lures that are ready for paint. I am going to get 2 more of these started with some slight adjustments. I am not sure if I want to keep working on the single piece or if I should saw it in half... PXL_20220516_173122538~3.mp4
-
Caught this guy on about the fourth cast with the jointed version. It swam pretty good but I didn't do a good enough job installing the bib. 2 casts after this fish it came out. It was swimming pretty good but there is room for improvement. Action is tight and violent. I think pinning the tail like Dan suggested will help. On the next one I will probably try moving the bib forward and make the angle less aggressive. Overall I am feeling pretty good about how it is going.
-
Like most of you, I can't stay focused on a project so in addition to the rat wakes I am dialing in I am giving a shad profile a shot. I started our with some 1.75 square basswood and cut the profile for 2 of them at once. I am trying a single piece and jointed design with everything else pretty close to the same. So far I have only tested the single piece. It didn't swim like I hoped. At really slow speed it will wake and the tail will kick like I want but at a more realistic speed it looses the tail action and just rolls back and forth. It seems like I got the bib pretty square because cranking it down will go straight and kick out to either side. But mostly it just goes straight with some body roll. I am going to try and move the tow point to see what that does. I don't think it will give me what I want but figured it would be good to see what that does before anything else. Once I see what that's like I am going to shorten the bib to see what that does. I think it actually needs to be wider to get the ass end to kick around more though. I am planning on testing the jointed version tomorrow. I put lead in the single piece already but I am going to wait on this one to see if it will work without it. I am sure I will end up putting some amount. Any advice and feedback is welcome!
-
I had a lot of issues like you described with alumilite resin. I was able to reduce the air pockets by cooking off moisture in an oven from the micro balloons and the a side of the resin. From the alumilite website: Moisture contamination in urethane resin causes foaming. If it foams quite a bit, most likely the moisture is right in the Alumilite. The moisture is usually in the A-side. There is not a full-proof method of removing moisture from your system. Typically the B side will crystallize when moisture is present. The A-side, however, will not look any different. You can try to use a molecular sieve in the A-side. Mix the sieve into the resin and allow it to settle to the bottom for a couple of days. Then test the resin to see if the sieve was effective in removing the air. You can also try to vacuum the A-side to relieve it of moisture. Vacuum the A side for 20-30 minutes until it completely stops bubbling. If you don't have access to vacuuming equipment or a molecular sieve, the last chance would be to boil the moisture off. This is possible because water has a lower boiling temperature than any of the other liquids in the A-side. To boil off the material, we recommend that you put the Alumilite resin in a glass or metal container and place the material in an oven at 250°F for 2 hours. This will draw the moisture out of the system and evaporate it. If you are getting a bunch of little pinholes, the moisture is probably coming from some materials you are using (mold, cups, stir sticks, filler, etc.). I hope this helps.
-
I tried getting a swim vid a few days ago but my puppy forced me to cut it short. She was looking like she was about to crush it lol Someone tell me if this video doesn't play. I am not sure if I am doing it right. PXL_20220412_011031394~2.mp4
-
No, not yet. I need to try a little lead and see how that impacts the action. In my opinion the action is right without the weight. It would be nice to have more weight so that it can cast further though.
-
Got another one ready to test. I made the bib shorter, wider, and at a less aggressive angle. I am hoping this one will dive less so I can work it faster on top. What are yalls opinions on rats diving? My last effort really gets down. Holding the rod tip at the water could get it to run around 3-4ft deep. I am somewhat tempted to tune these to blow out so it's possible to get it in quickly without cranking it down. It's definitely easier to tune it to blow out....